Sort Optimization (Part 2) with JDK 6 vs JDK 7
In part 1, I went over my first foray into the world of sorting algorithms. Since then, I’ve had some other ideas on how to improve my quicksort implementation. One idea that I had while originally working on the sorting algorithm, was to rework the partition function to take into account duplicate elements. I had a few different working implementations, but all of them came with severe performance penalty. I finally figured out a way to get performance close to the previous algorithm.
The partition function needs to perform the minimal number of swaps possible. So moving towards the center from both ends and only swapping when both are out of order is the best approach I’ve found so far. When grouping duplicate elements, they are swapped to the beginning of the partition area as they are found. Then at the end, a pass is run to move them to their correct location in the final list. Then instead of returning one number from the partition function, it returns two. It returns the minimum and maximum indices on the range that has the pivot value.
Another area that I was able to get some performance gain out of was getting rid of the shell sort form the first algorithm. While that was there to make sure the quicksort did not recurse too deeply, in practice the shell sort algorithm doesn’t run.
Results
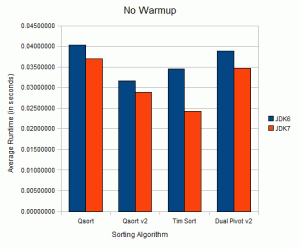
Here are the results of JDK 6 MergeSort, Tim Sort, QSort, QSortv2, and Dual Pivot sort 2 benchmarked on the same set of files. Overall, the new version doesn’t outperform the old version, but I thought it was worth posting my findings. On most data sets with duplicates it does perform better. I ran these benchmarks on OpenJDK 7 because I was curious as to how they would compare to one another.
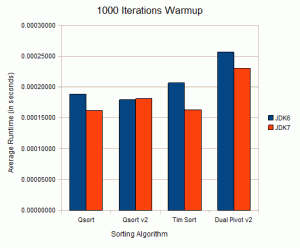
It’s important to note that the tables are speedup relative the Java implementation on the given JDK. The graphs are the average runtimes for each algorithm. The reason for doing the average runtime is that it could show the performance difference between Sun’s JDK 6 and OpenJDK 7 build 73.
Conclusions
Overall the new version of the Qsort implementation doesn’t improve greatly over the previous implementation. While it didn’t work out to be the performace improvement I was looking for. I think the last graph with 1000 iterations of warmup for each algorithm is the most interesting. The Qsort v2 implementation apparently doesn’t get handled any better by OpenJDK 7. The partition function is larger after my changes, so perhaps it didn’t JIT very well. What is interesting is the boost that Tim Sort saw with the change of JDK’s. Running these benchmarks made me realize that upgrading my Java Runtime will increase the performance of all my Java applications. It will be interesting to see if the performance carries over to Netbeans and Eclipse; I expect it will.
In: Java · Tagged with: benchmarks, shootout, sorting
Sorting Algorithm Shootout
Since I did my Sort Optimization post, I’ve been keeping an eye on things that happen in the sorting world. Recently an article popped up on Reddit about someone wanting to replace the JDK sorting algorithm with a Dual Pivot Quick Sort. This lead to the discovery that Tim Sort would be replacing Merge Sort in the JDK starting with version 7. This probably got some attention because of the OpenJDK project. It’s nice to see that allowing more developers to work on different areas of the JDK. First I’ll do a quick overview of the algorithms, then show some benchmarks. All algorithms are written in Java.
JDK 6 Sort
The JDK6 implements a fairly standard Merge Sort. It will switch to an insertion sort at a specific depth.
QSort
This is the implementation of quicksort I outlined in the earlier blog post. It performed admirably at the time, but how will it hold up against tougher competition. It’s pretty much an iterative quicksort, that short-circuits to a shell sort if it’s going too deep.
Original QSort Post:
Sort Optimization
Tim Sort
This is an optimized in place variation of a merge sort. Tim Peters developed this sorting algorithm for the Python programming language. It is in use by Python and will be used by Java starting with JDK 7. It takes advantage of partially sorted parts of the list.
Available here:
http://bugs.sun.com/bugdatabase/view_bug.do?bug_id=6804124
http://hg.openjdk.java.net/jdk7/tl/jdk/rev/bfd7abda8f79
Dual Pivot Quick sort
This is a newcomer to the sorting table. Developed by Vladimir Yaroslavskiy for the inclusion into the Java language. The premise is the same as quick sort, only it will choose two pivot points rather than one. He did a full writeup detailing the algorithm, and its benefits. I did modify it to take the comparable interface, and Vladimir explicitly said this was not the intended target of the algorithm. He has stated it is designed to work directly with primitive types. I don’t see how doing an int comparison vs a Integer.compareTo() would be different, as long as they are used uniformly between all algorithms. Since my sorting algorithm works with comparable, as does Tim Sort, I chose to convert this algorithm to use the Comparable interface also.
Available here:
http://article.gmane.org/gmane.comp.java.openjdk.core-libs.devel/2628
Results
These tables show the speedup relative to JDK 6 with and without warm up.
Here is the original text data if you’re interested in that. These are in simple table format. The columns store the runtime in seconds for each algorithm. The number in parenthesis is the speedup relative to JDK 6.
Tim Sort is definitely the way to go if you’re interested in a stable sorting algorithm. I was pretty amazed when I first looked at the results with how well it actually it did. It really takes advantage of any presorted parts of the lists. Overall, I’d say my optimized quicksort does fairly well, but maybe it could do better. I may have to look into that again.
In: Java · Tagged with: shootout, sorting
Starting Python, Elixir, and SQLite
When I did the post about Storm, someone suggested that I look into Elixir. Since I didn’t have time to at the time, I made a note of looking into it at a later time. That time is now. :)
Elixir and Storm are very similar, they’re both object relational mappers that provide an easy way to map your objects to database tables. In a future post, I’ll do a more in depth comparison between the two in a future post.
Starting out, Elixir uses SQL Alchemy as a backend. While working with the tool you will probably find yourself running into things you may not understand if you’re not familiar with SQL Alchemy. Keeping open a tab in firefox pointed at the SQL Alchemy documentation can be useful. It does show through in certain instances.
There are two main starting points for an ORM tool. There is the case where you’re starting with an existing database, and the case where you’re setting up the database from scratch. Mapping to a table that already exists with Elixir can be a little tricky depending on the relationships.
It’s as simple as this to connect to a database:
metadata.bind = "sqlite:///../sizedb.sqlite" |
Here is a simple example:
class Location(Entity): using_options(tablename='TABLE_LOC') loc_id = Field(Integer, primary_key=True) location = Field(UnicodeText) |
And here is a more complex example of connecting to an existing database table:
class Comparison(Entity): using_options(tablename='TABLE_COMP') comp_id = Field(Integer, primary_key=True) date_added = Field(DateTime, default=datetime.datetime.now) hits = Field(Integer, default=1) smaller = ManyToOne('Phrase', colname='smaller_id') larger = ManyToOne('Phrase', colname='larger_id') sentences = ManyToMany('Sentence', tablename='TABLE_COMP_SENT', local_side='comp_id', remote_side='sent_id', column_format="%(key)s") |
I left out most of the class specific code to focus on Elixir. One thing that took a while to figure out was how to setup a ManyToMany relationship with specific columns in my database. The column_format parameter is the key to being able to specify your column names directly. I really didn’t have to use any other options besides what you see above when connecting to an existing database. Overall, I had about five database tables to connect.
Now if it was not being setup with an existing database, many of the parameters in the different relationships are unnecessary. For comparison here is the same example if Elixir is used to create the database tables:
class Comparison(Entity): comp_id = Field(Integer, primary_key=True) date_added = Field(DateTime, default=datetime.datetime.now) hits = Field(Integer, default=1) smaller = ManyToOne('Phrase') larger = ManyToOne('Phrase') sentences = ManyToMany('Sentence') |
As you can see, it gets quite a bit simpler. The underlying table information is no longer needed. It created tables that were very similar to my hand-created tables that I had used with Storm. When it comes to queries on the database, SQL Alchemist shows through.
I found the documentation on the Elixir webpage to be a little bit lacking in terms of queries. SQL Alchemist has a page that more fully describes the query functions. AND and OR operators are named and_ and or_, respectively, probably because and and or are reserved in Python. I thought this was worth mentioning because they are common SQL operators.
In: Python · Tagged with: elixir, sqlite
Spell Checking in Python
I was looking into spell checking in Python. I found spell4py, and downloaded the zip, but couldn’t get it to build on my system. If I tried a bit longer maybe, but in the end my solution worked out fine. This library was overkill for my needs too.
I found this article here: http://code.activestate.com/recipes/117221/
This seemed to work well for my purposes, but I wanted to test out other spell checking libraries. Mozilla Firefox , Google Chrome, and OpenOffice all use hunspell, so I wanted to try that one (as I’m testing the spelling of words on the Internet). Here are some python snippets to get you up and running with the popular spelling checkers. I modified these to take more than 1 word, split them up, and then return a list of suggestions. They do require each spelling checker to be installed. I was able to do this through the openSuSE package manager.
import popen2 class ispell: def __init__(self): self._f = popen2.Popen3("ispell") self._f.fromchild.readline() #skip the credit line def __call__(self, words): words = words.split(' ') output = [] for word in words: self._f.tochild.write(word+'\n') self._f.tochild.flush() s = self._f.fromchild.readline().strip() self._f.fromchild.readline() #skip the blank line if s[:8] == "word: ok": output.append(None) else: output.append((s[17:-1]).strip().split(', ')) return output |
import popen2 class aspell: def __init__(self): self._f = popen2.Popen3("aspell -a") self._f.fromchild.readline() #skip the credit line def __call__(self, words): words = words.split(' ') output = [] for word in words: self._f.tochild.write(word+'\n') self._f.tochild.flush() s = self._f.fromchild.readline().strip() self._f.fromchild.readline() #skip the blank line if s == "*": output.append(None) elif s[0] == '#': output.append("No Suggestions") else: output.append(s.split(':')[1].strip().split(', ')) return output |
import popen2 class hunspell: def __init__(self): self._f = popen2.Popen3("hunspell") self._f.fromchild.readline() #skip the credit line def __call__(self, words): words = words.split(' ') output = [] for word in words: self._f.tochild.write(word+'\n') self._f.tochild.flush() s = self._f.fromchild.readline().strip().lower() self._f.fromchild.readline() #skip the blank line if s == "*": output.append(None) elif s[0] == '#': output.append("No Suggestions") elif s[0] == '+': pass else: output.append(s.split(':')[1].strip().split(', ')) return output |
Now, after doing this and seeing the suggestions. I decided a spell checker isn’t really what I was looking for. A spelling checker always tries to make a suggestion, and I wanted to filter out things from a database. I started this with the hope that I would be able to take misspellings and convert them into the correct word. In the end, I just removed words that were not spelled correctly using WordNET through NLTK. WordNET had a bigger dictionary than most of the spell checkers which also helped in the filtering task. NLTK has a simple how to on how to get started using WordNET.
In: Python · Tagged with: nlp, spelling checker
NLTK vs MontyLingua Part of Speech Taggers
This is a comparison of the part of speech taggers available in python. As far as I know, these are the most prominent python taggers. Let me know if you think another tagger should be added to the comparison.
MontyLingua includes several natural language processing (NLP) tools. The ones that I used in this comparison were the stemmer, tagger, and sentence tokenizer. The Natural Language Toolkit (NLTK) is another set of python tools for natural language processing. It has a much greater breadth of tools than MontyLingua. It has taggers, parsers, tokenizers, chunkers, and stemmers. It usually has a few different implementations of each providing different options to their users. In the case of stemmers, they have the Punkt and WordNet stemmers. Both of these tools are written to aid in NLP using Python.
Taggers
For those that don’t know, a tagger is a NLP tool that will mark the part of speech of a word.
Example:
Input: “A dog walks”
Output: “A/DT dog/NN walks/VBZ”
The meanings of the tokens after the / can be found here.
For NLTK, I’m comparing the built-in tagger to MontyLingua. I didn’t do any training at all and just called nltk.tag.pos_tag(). I used the taggers mostly as is, with some slight modifications. I added a RegExp tagger in front of the NLTK tagger, and make the default tagger the backoff tagger. It will mark A, An, and The as DT always. It was annoying and messing up my results to have them marked as NNP. They were capitalized, and I suppose the tagger thought they were either initials or proper names.
MontyLingua on the other hand was always marking “US” as a pronoun. This was a problem when scanning sentences that said “US Pint” or “US Gallon.” I look at the word before “US” and see if it’s an article, if it is I allow it to continue being processed. Neither tagger is perfect, but it becomes clear that one may be better than the other for my use-case. It may be different for yours. I’m scanning sentences from the web.
Stemmers
A stemmer is a tool that will take a word with a suffix attached to it, and return the ‘stem’ or base word of it.
Example:
Input: dogs
Output: dog
While neither stemmer is perfect, they both do a decent job. MontyLingua is more inclined to take the ‘S’ off the end of something, and the NLTK WordNetLemmatizer doesn’t always take it off. ‘Cows’ is an example of a word the WordNetLemmatizer will not stem to ‘Cow’ but MontyLingua will. On the other hand, MontyLingua is more likely to take the ‘S’ off the end of an acronym, and I wrote code to correct that in some cases. If a word is less than 4 characters or all consonants, I don’t run it on the MontyLingua stemmer. The all consonants is to catch some acronyms. While using MontyLingua on a specific part of speech it’s important to specify whether it’s a noun or a verb with the ‘pos’ parameter. Since I’m only stemming nouns, I used pos=’noun’.
Results
The first results don’t only reflect a change in taggers, but changes in the stemmer and sentence tokenizer also. I did another comparison using the MontyLingua tagger with the NLTK stemmer and sentence tokenizer for comparison.
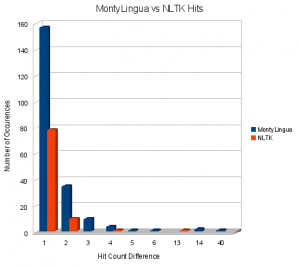
A phrase found by one algorithm and not by another is shown first. They both were able to find some words that were not found by the other. Hits is the number of times a phrase comes up, it is displayed only if there is a discrepancy. If MontyLingua and NLTK both found a phrase but found it a different number of times, that is reflected there. The first numbers are totals for every discrepancy summed. There is also a graph below showing how many of each difference there is. For example there were 157 times that there was a discrepancy of 1 hit and MontyLingua came out on top. There were 78 times the number of hits were different by 1 and NLTK had more. An interesting one is there was one time MontyLingua had one word with 40 hits more than NLTK. That word was elephant.
MontyLingua toolchain vs NLTK toolchain
In MontyLingua but not NLTK: 514
In NLTK but not MontyLingua: 403
Total Hits: MontyLingua: 1421 vs NLTK: 1184
| Hit Count | MontyLingua | NLTK |
| 1 | 157 | 78 |
| 2 | 35 | 10 |
| 3 | 10 | 0 |
| 4 | 4 | 1 |
| 5 | 1 | 0 |
| 6 | 1 | 0 |
| 13 | 0 | 1 |
| 14 | 2 | 0 |
| 40 | 1 | 0 |
On average MontyLingua had more hits than NLTK on words
MontyLingua Tagger NLTK Stemmer & Tokenizer (ML-NLTK) vs MontyLingua Toolchain
For the sake of completeness here are the results of the MontyLingua tagger with the NLTK stemmer and tokenizer.
In ML-NLTK but not in MontyLingua: 65
In MontyLingua but not in ML-NLTK: 68
Total Hits: ML-NLTK: 290 vs MontyLingua: 299
| Hit Count | MontyLingua | ML-NLTK |
| 1 | 20 | 17 |
| 2 | 0 | 2 |
| 10 | 1 | 0 |
Total Phrases Found By
| Name | Phrase Count |
| NLTK | 3777 |
| ML-NLTK | 3885 |
| MontyLingua | 3888 |
At the end of the day, I’ll be using the MontyLingua toolchain with some slight modifications I’ve made (mentioned above). I’m definitely still using NLTK, just for different tasks. NLTK has a great and easy to use regexp chunker that I’ll continue to use.
Again, a tagger’s performace can vary greatly based on the data used to train and test it. I was testing them on about 12,000 webpages I downloaded and looking for specific phrases. On a different data set NLTK may turn out to be better.
In: Python · Tagged with: benchmarks, nlp, taggers


